Cadaver Walkthrough & Maps
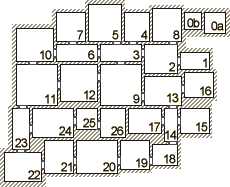
Level one
In 1 take the diary and insert it into the slot on the wall. This unlocks the door.In 2 pick you diary up again (It's on top of the small wooden table). Search the corpse (Pile of bones) and get the diary that is revealed. Return to 1.
In 1 insert this diary in the slot. Go to 4 via room 3.
In 4 move the pillow on the bed to reveal a dagger, get it. Open the cabinet and get the flask (Super Fast) and the holy symbol. Go to 5.
In 5 open the cabinet and get the key and cash. Look behind the barrel for a book that explains some of the story. Return to 3 hold the Daggers ready for action then go to 6.
As soon as you enter 6, start shooting at the slime that is making it's way towards you. Do not bother shooting the second slime, he is invincible! Insert the key in the keyhole to unlock the north door. Go to 7.
In 7 search the corpse and get the diary. Leave the chest for later, it is trapped. Return to the secret passage and insert the diary you have just picked up into the slot. (This has unlocked a door north of the Guests Entrance) Go to 8.
In 8 get the orb from the altar (a teleport spell) and now you can play with the levers! Pulling the middle lever down and casting the teleport spell will transport you to the room you want to go to, and is the only one you need to do. However, you can set only the third lever and cast the teleport spell to take you to the MONEY PIT (0a) for bonus cash. However, you are then transported to the CATCHER ROOM (0b), where you have to catch 5 falling gems before they hit the floor to escape. Anyway, just set the middle lever down and cast the teleport spell for now.
In 9 search the corpse in this room and get the diary. Also, get the chicken and the two chicken legs. Open the cabinet and get the scroll (Dispel Trap) and pull the lever to unlock the exit. Return to 1 and insert the new diary into the slot . Go to the 8.
In 8 open the chest to get the cash (Opened by inserting the diary in the slot).
Now go to 7 and cast the Dispel Trap spell on the chest. Get the dagger, the green casket and the orb (Turn Monster) and return to 2.
In 2 insert the two daggers into the altar, search the altar and recover the two daggers. Search the skull on the wall, get the key and open the chest in this room. Get the holy symbol and the orb (Massacre). Go to 10.
In 10 listen to the spiel by the undertaker, then give him the chicken. Take the flask on the table (Stamina) and the red casket he has just given you.
In 11 jump on the bar so you are to the north of the barman. You are about to be tested by a drinking challenge. Listen to the barman, and when he drops the six tankards of ale, start drinking them in this order : The tankard on the bar, the tankard in front of the barman, the tankard by the chair, the tankard by the low stool and the two tankards by the east exit. Now, recover you breath and pick up the cash bag and wait! Jump on the bar and get the coins and the lodestone. Now, drop down and pick up the slime!
In 12 hold the turn monster spell. The idea in this room is to use the turn monster spell to force the slime's under the hammer, killing all three and revealing a key for your exit. When you have done this, insert the key in the keyhole, get the green casket, jump on the platform, pull the lever.
Go via 9 to 13.
In 13 (Notice the key fall into the barrel) pull the lever twice (Helps later), get the green casket. Open the strong box and insert the casket you have just picked up into the strong box (Search the strongbox if you want to know why you do this). Insert your two holy symbols into your other two green caskets and insert both of these into the strongbox. Open the strongbox and get the scroll (Dispel Trap). Go via 14 (Avoid the rotating flails!) to room 15.
In 15 drop the lodestone (Magnet) as near to the teleporter stone as you can. This will attract the key to the teleporter stone and transport the key to your side of the magic field. Get the key and open the chest. Get the bomb and grey key. Insert the key into the keyhole to dispel the magic field. Get the scroll (Unlock Chest) and the flask (Stamina). Open the strongbox and get the scroll (Dispel Magic).
Return to the 13. Insert the bomb into the barrel the key dropped into, and wait till it explodes. Get the key, inserting it into the keyhole.
In 16 open the chest and get the two black flasks (Unknown). Get the green flask (Giant Jump) and the red flask (Immortal) and one of the dipsticks. Return to 15.
In 15 touch the teleporter, drink the immortal potion and cast the Dispel Magic spell quickly on the teleporter. Get the cash and key, open the small red casket and get the flask (Stamina).
In 14 hold the dipstick and throw it towards the flails so they get trapped together in the middle of the room. Now, drink the Giant Jump and Super Fast, jump over the flails, pull the lever and jump back.
In 17 run to the lever and pull it, stopping the darts (Note, this only works if you pulled the lever twice in 13). Get the small key, open the chest in the south-west corner of the room and get the cash. Dispel trap on the other chest and open it with the Unlock Chest spell. Dispel trap on the strongbox revealed and open it. Finally, Dispel Trap on the two grey caskets and open them, getting the orb (Activate) and scroll (Learn Potion).
In 14 jump over the flails again and go to 18.
In 18 drop one of the black unknown potions and cast the learn potion spell on it. If this potion is poison, leave it and drink the other black potion, otherwise, it will be a strength potion, the one you should drink. After drinking, push the board out of the way and pull the lever (Make sure you don't move the board too far so it blocks the door). Get the orb (Reveal).
In 19 get the two chicken legs. Hold the Reveal spell, stand by the east door and cast the spell. The idea now is to build your own staircase by standing on the block you have just revealed and casting the spell again. You will have to cast it 8 times before it is high enough to exit.
In 20 drop your slime creature. He will go and get all the silver coins for you. Pick up slime when he comes back to you. Cast the activate spell to send the platform to the other side of the fireballs. Now, using the daggers or the massacre spell, kill the slime with the chain attached to it to make the barrel fall onto the platform. Cast the activate spell again. Hold the activate spell, and, using the barrel as a shield, cast the spell and get to the west of the room.
In 21 press the button four times, then press the revealed button once, and finally, press the first button three more time. The door will unlock.
In 22 go to the North East corner of the room and drop a chicken leg. When the slime comes towards it, jump over, hold a chicken leg and throw it as near to the North West corner of the room. Then, throw a chicken leg to the South West corner of the room, and drop one near the South east corner. The slime will hopefully clear a path so you can get the key, put it in the keyhole and go to 25 via 23 and 24.
In 25 pull the lever and proceed to 26.
In 26 pull the lever, and get the charm. Open the chest, get the cash and key. Return to 25.
In 25 drink the last strength potion, and drag the block out of the way of the door. Go to 24.
In 24 go and search the slot. A token will fall. Don't go and get it yourself, drop the slime and let him go and get it. When he returns, pick him up and search him. The token will fall. Pick up the token and insert it into the slot. Drop your slime monster, letting him fight the creature for you. Both the creatures will die, and stop any fire balls that are produced. Leave the teleporter that was revealed. Go to 25 pull the lever twice and return to 26.
In 26 get the cash, wand (Unlock Door) and teleporter (Teleporter to be picked up last).
In 23 hold the unlock door spell and cast it on the door north.
In 11 insert the gold key into the keyhole and leave this level.
~ Based on Steve Kelly`s solution
